Latest

Five Books For Garden Inspiration

Five Books For Garden Inspiration

I've always loved gardens, but now that I have my own outdoor space my interest has been piqued. This goes hand-in-hand with another of my passions - books. Over the years I've built up quite a collection of them, and many about gardens and gardening. Even though I've never really had the chance to create my own garden, I was keen to build my taste and gain a lot of inspiration for the time when I would be able to have a place outside that was mine. 

Today I wanted to share with you five books about gardening that have inspired me. From practical guides that have been so useful for a complete beginner like me, to lavish coffee-table books that simply provide a place to daydream. These books provide the perfect dose of inspiration whether you have acres of land, or like me, looking for help with small garden ideas.

GARDEN INSPIRATIONS - CHARLOTTE MOSS


This is one of my favourite books about gardens of all time. It not only celebrates the beauty of the garden, but also how they can intersperse throughout every area of our home and lifestyle so that we can get maximum pleasure from them.

Charlotte Moss has written countless books on style and entertaining, each one more beautiful than the last. If you are looking to be deeply inspired - this is the one for you.


CLICK HERE TO SHOP

THE FLOWER YARD - ARTHUR PARKINSON


This book by Arthur Parkinson focuses on growing flamboyant flowers in containers - perfect for someone like me who has a courtyard garden and can only use pots and containers to add colour and life to my space. 

Arthur became famous on Instagram by sharing his small but beautiful garden which was abundant with containers of all different flowers - it proved that even if you are limited on space, you can still have your own garden. 

This is a new read for me and I'm excited to learn more about gardening in containers and how I'll be able to have beauty to look forward to throughout the year with a variety of blooms even though I only have a small patio garden. 


CLICK HERE TO SHOP 

QUIET CORNERS OF PARIS - JEAN CHRISTOPHE NAPIAS


This is another book that I discovered when looking for inspiration for my courtyard garden. I've visited Paris on a number of occasions and have fond memories of the charming courtyard gardens that the city is littered with. 

I chose this one for some ideas of how I could add some formal elegance to my space. Although I do love cottage-style country gardens, living in the city means that I have to think about my surroundings and environment - a cottage garden would perhaps look a little odd amongst the Georgian architecture of my city. 

This book is filled with glorious photographs of the most chic and beautiful Parisian gardens, public parks, arboretums, galleries, and shops - places that you might never have discovered even if you're a local. 


CLICK HERE TO SHOP

HOW TO GARDEN WHEN YOU RENT - MATTHEW POTTAGE

This book from the RHS is a great choice if you want to enjoy the pleasures of gardening but don't own your home. There is often the dilemma when renting of whether to 'waste' money investing in a property that is not yours - this book solves this problem and advises how to create your own garden whilst keeping the landlord happy. 

Filled with handy tips and knowledge for garden design ideas that won't break the bank or be too permanent, from small patios, to more substantial gardens - this is a useful and practical garden book for the age of the renter!

CLICK HERE TO SHOP

THE COMPLETE GARDENER - MONTY DON


I'm a real fan of Monty Don - I love his relaxed but elegant approach to gardening and could spend hours watching his TV show, Gardeners World.

In this book, Monty provides the reader with his knowledge of gardening, covering every aspect of gardening so that everything you need to know is in one place. The advice is practical, imaginative, and inspiring - helping you to create gardens that are not only beautiful, but also sound.

Filled with glorious photographs, this is the gardening bible you have been looking for! 

CLICK HERE TO SHOP 

Continue reading

A Downton Abbey Tea Party

A Downton Abbey Tea Party
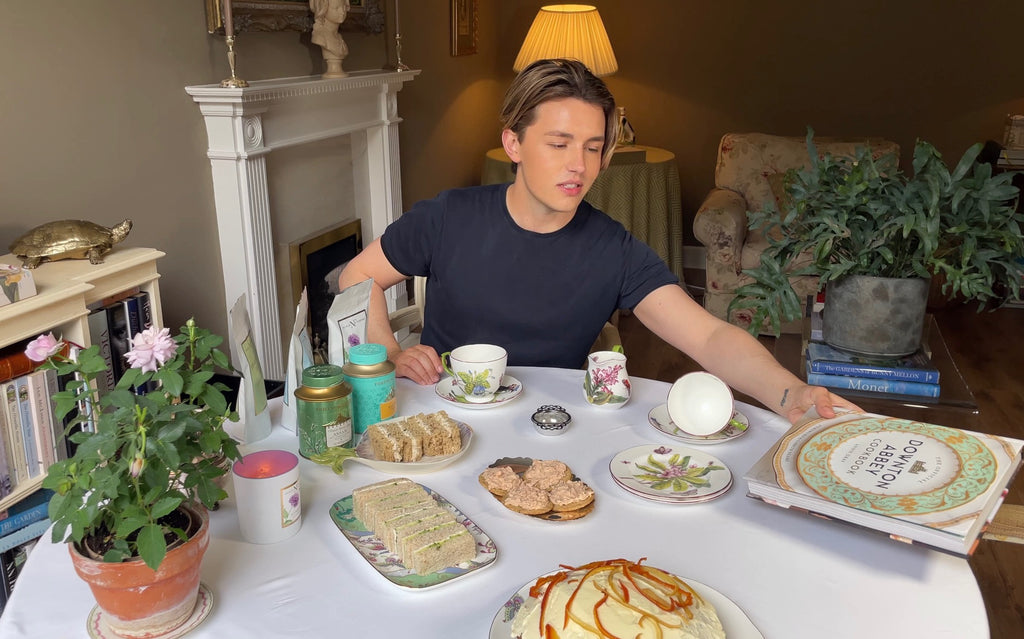
As you may have seen from my most recent YouTube video, I went to see the new Downton Abbey Movie at the weekend. I so enjoyed the film and left feeling inspired to have my own Downton Abbey Tea Party. Here are the recipes I made in the episode. Enjoy!


Orange Layer Cake

For the Cake

  • 1 large orange
  • 2 medium lemons,
  • 1/2 cup unsalted butter room temperature
  • 1 cup superfine sugar
  • 1 3/4 cups Flour
  • 1 3/4 tsp. baking soda
  • 1 pinch salt
  • 5 large egg yolks

For Candied Peel

  • 1 cup water
  • 1 cup Granulated sugar

For the Icing

  • 2 cups icing sugar
  • 1 pinch salt

For the Filling

  • 4 tbsp. orange marmalade

Instructions

Use a paring knife to remove the peel from the orange, ensuring you take the least amount of which pith that you can. Try to get long peels of at least 2 inches. Put the peel in a small bowl. Do the same for the lemons, and place them in a separate bowl.

Juice the oranges and lemons, placing the juice with corresponding peels. Let the juice marinate in the peels for one hour, then strain the juices into separate bowls and reserve along with the peels.

Put the orange and lemon peels into a small saucepan, add cold water to cover, and bring to a boil over high heat. Boil for a couple of minutes, then drain, discarding the water, and then return the peels to the pan. Repeat twice, discarding the water each time. Meanwhile, line a large sheet pan with parchment paper.

When you have boiled the peels three times, return them to the pan, and add the 1 cup water and the granulated sugar, and bring to a boil, stirring to dissolve the sugar. Adjust the heat to maintain a simmer and simmer until the peels are tender and any pith has become translucent, 25-30 minutes. Drain well and use a fork to place on the cooking sheet in a single layer to let cool.

Finally, dry the peels in a low oven 250F until they are crisp but not browned, about 30 minutes. Set aside.

Make the Cake

Preheat the oven to 350F. Butter the bottom and sides of two 9 inch round cake pans. Line the bottom with parchment paper and butter the parchment. Dust the sides with a mixture of equal parts of superfine sugar and flour, tapping out the excess.

In a bowl, combine the flour, baking soda and salt. Whisk gently to combine. In a stand mixer with a paddle attachment or a large bowl with a hand mixer, cream together the butter and the superfine sugar on medium speed until smooth and creamy.

Add egg yolks one at a time, mixing well after every addition, then beat for 10 minutes. The mixture should be pale and fluffy.

On low speed, beat in 2 tablespoons of the flour mixture to prevent curdling, then add the rest of the flour mixture in three batches, alternating with the reserved orange juice, beginning and ending with the flour mixture, mixing well after each addition.

Divide the batter evenly between the two prepared baking tins, spreading to the edges.

Bake until a skewer inserted into the center of each cake layer comes out clean, 20-25 minutes. Let cool completely in the pans on wire racks. Using a blunt knife, loosen the edges of the cakes from the pan sides, then invert the pans onto the racks, lift off the pans, and gently peel off the parchment. Work carefully as the layers are very light and delicate.

Make the Icing

To make the icing, put the confectioner's sugar, lemon juice and salt in a bowl and mix together.

Assemble the Cake

Place a cake layer on a serving plate and spread the top with marmalade. Top with the second layer, then using a palette knife or offset spatula, frost the top and sides of the cake with the icing. Sprinkle the top with the candied peel. Let the cake stand for 15 minutes to set the icing before serving.

Recipe from The Downton Abbey Cookbook

Chicken Finger Sandwiches


Ingredients
  • 1 pack diced chicken breast - cooked
  • 1 tablespoon of Creme Fraiche
  • 1 teaspoon of French Mustard 
  • A good sprinkling of Sea Salt
  • Juice of half a Lemon
  • White or Brown bread - crusts removed
Instructions 

Add the cooked chicken breast with all of the other ingredients to a blender and pulse until combined but still chunky.

Spread the chicken mixture onto your bread and cut into fingers.

Smoked Salmon Mousse


Ingredients

  • 1 pack of Cooked Smoked Salmon
  • 1 tablespoon of Creme Fraiche 
  • A sprinkling of Sea Salt
  • Juice of half a Lemon
  • A teaspoon of Italian Seasoning 

    Instructions

    Add all of the ingredients to a blender and pulse until smooth and creamy.

    Pipe the Salmon Mousse onto round crackers and serve

    CLICK HERE TO WATCH THIS EPISODE ON YOUTUBE 
Continue reading

BRIDGERTON IS BACK - A look at the houses and sets in season 2 of the hit Netflix series

I don't know about you, but after finishing the last episode of The Gilded Age, I was yearning for another beautiful period drama. Thankfully we didn't have to wait too long - Bridgerton has returned! Continue reading

GLENEAGLES - AN ELEGANT SCOTTISH RETREAT

GLENEAGLES - AN ELEGANT SCOTTISH RETREAT
In my most recent YouTube video I traveled to Gleneagles, a Scottish hotel and golf resort in Perthshire that was established in 1924. Just over an hour away from Edinburgh, this is one of my favourite places to come when I want to escape the city and enjoy the luxury of peace and scenic beauty. Continue reading

5 SKINCARE PRODUCTS I'M LOVING RIGHT NOW

1) FRESH - Rose deep hydration sleeping Mask

It's pretty clear by now that I'm drawn to all things rose! Maybe it's because I'm English, but I can't get enough of the sweet scent, and the beautiful allure of the bud with its delicate petals. 

I received this deep hydration sleeping mask as a gift from a friend and have been using it regularly - especially on days when my skin is feeling particularly parched after being outdoors in the harsh Scottish climate.

You put it on after your evening skincare regime has been completed and then leave it on whilst you sleep. It instantly drenches the skin with moisture, and when you wake your complexion is dewy and bright.

CLICK HERE TO SHOP

2) SARAH CHAPMAN - Skinesis eye recovery


Although I'm somewhat an addict when it comes to skincare, I don't usually like to spend too much on products. However, this eye recovery serum from Sarah Chapman is an exception. The under eye area can be problematic for me, so I'm willing to spend a little more.

It really does work well to brighten the eyes and smoothen any lines - something that I'm noticing more of now I'm in my early thirties. This serum has patented technology which is said to have a Botox-like-effect on the under eye, and I can say that fine lines do appear diminished after use. 

CLICK HERE TO SHOP

3) THE ORDINARY - Hyaluronic Acid 2% + B5


My skin can be very dry - especially during the Winter. Hyaluronic acid is a great product for attracting moisture to the skin and keeping it hydrated throughout the day.

I particularly like this one by THE ORDINARY because it is incredibly well priced, and also works really well for my skin. Sometimes these types of serums can leave me itching and uncomfortable, this is very lightweight and I forget about it soon after applying. 

CLICK HERE TO SHOP

4) KIEHL'S Ultra facial moisturiser SPF30


I've often talked about how I think SPF has helped my skin to stay looking youthful. I've been wearing an SPF daily for at least the last ten years and every professional I've spoken to touts this as the most important thing to keep our skin in great condition and prevent premature ageing. 

I love this moisturiser from Kiehl's because again, it is incredibly hydrating yet super lightweight, and it has a built in SPF. A win-win. 

CLICK HERE TO SHOP

5) MARIO BADESCU - Facial Spray with Aloe, Herbs, and rosewater


Facial mists are another of my skincare must-haves. I spritz my skin with them when it needs refreshing, or even after applying make up to give a dewy look and brighten any matte texture. 

This one by MARIO BADESCU is incredibly soothing with aloe, herbs, and rosewater. I first started using it in Summer when visiting London. I was shopping in an intense heatwave when I saw this on the shelf and was instantly drawn to it. It worked wonders then, and I'm still using it now - an all-rounder, whatever the season

CLICK HERE TO SHOP

Continue reading

ITALIAN CREAM CAKE


On my Birthday there is nothing I love more than cake and champagne. Having my friends over to enjoy this with me is the perfect way to spend the day. Here is the recipe from my recent YouTube episode - enjoy!

For the cake

  • 2 cups / 250g / 4 ½ oz plain flour
  • 1tsp baking soda
  • ½ tsp baking powder
  • 1 cup / 225g / 8oz salted butter
  • 1½ cups / 300g / 4oz granulated sugar
  • ½ cup / 110g / 4oz light brown sugar
  • 2tsp vanilla extract
  • ½ tsp almond extract
  • 5 large eggs
  • 1 cup / 250ml whole buttermilk7
  • 7oz packaged sweetened flake coconut
  • 1½ cups / 118g pecans (toasted)

For the frosting

  • 2 packs (8oz) cream cheese
  • 1 cup / 225g / 8oz unsalted butter
  • 2lb powdered sugar
  • 2 tsp vanilla extract
  • ½ tsp almond extract
  • 7oz sweetened flake coconut
  • ½ cup / 65 toasted pecans

Instructions

  1. Cream together the butter, granulated sugar, brown sugar, almond extract, and vanilla extract in a mixer until fully combined. About 3-4 minutes.
  2. Add the eggs one-by-one, beating after each addition. Once all of the eggs have been added, give the mixture a good whisk. 
  3. Add in the baking powder and baking soda. Then mix in a little of the flour and buttermilk, a bit at a time, whisking after each addition. Repeat this until  all of the flour and buttermilk are fully combined. 
  4. Stir in the coconut and pecans by hand, then divide this mixture between three cake tins. 
  5. Bake in the oven at 350f / 180c for 25-30 minutes until a skewer inserted in the cake comes out clean. 

For the frosting

  1. In a mixer beat together the cream cheese and butter until smooth and fluffy.
  2. Add in the vanilla extract and the almond extract, whisk to combine.
  3. A tablespoon at a time, add in the powdered sugar, mixing after each addition.
  4. Once the cake has fully cooled, spread the frosting between the layers, and then on the top and sides of the cake so it is fully coated in the frosting.
  5. Use the remaining coconut to cover the top and sides of the cake - this can be very tricky! Just take your time and have patience.
  6. Sprinkle the remaining pecans on top of the cake.

    Recipe adapted from: https://www.melissassouthernstylekitchen.com
Continue reading

5 GIFTS TO HELP MAKE LIFE MORE BEAUTIFUL


As it’s my Birthday this week, I thought I’d focus this blog on gift-giving. I have chosen 5 gifts that are part of our everyday lives, but often overlooked. These items are unique and special, bringing small moments of joy to the often mundane rituals we all have to go through. It is always the small things that make the biggest difference, so I hope you will be inspired by my choices, whether you are looking for a lovely present for a dear friend, or just wanting to treat yourself!


John Derian Paperweight 


When gift-giving I always try to find unique and special things that the person I’m gifting for might not have seen before. These paperweights by John Derian are exactly that - handmade using collaged paper under blown glass, this is an item that you can admire and keep for the rest of your life. 

CLICK HERE TO SHOP

Chintzy Bow Linen Hand Towel - Isla Simpson


Isla Simpson is a British artist and designer who I discovered through Instagram. I often include her in my gift-guides, simply because I love her unique and beautiful products that are almost like stepping back in time. These Chinzty Bow linen hand towels would be so beautiful in a guest bathroom, or even for everyday use in the kitchen.

CLICK HERE TO SHOP

Mason Cash ceramic measuring cups


These will be so well received by someone who loves cooking or baking. Again, this is about bringing beauty to the mundane and overlooked. Having these elegant ceramic measuring cups to hand whilst in the kitchen will bring a little moment of joy. 

CLICK HERE TO SHOP

Pansy Paper Flower Plant - Cutterbrooks


Although I do love nothing more than receiving flowers or plants, there is always the heart-sinking moment when they begin to fade. The joy of this plant, although admittedly expensive, is that it will last forever. Handmade in New York by artist Livia Scetti, these antiques of the future are a wonderful gift for a very special Birthday.

CLICK HERE TO SHOP

Scented Matches from Cire Trudon

If like me you light a lot of candles, these scented matches will be the perfect little present. As you know, I think that everything in life should be beautiful, even matches! 

CLICK HERE TO SHOP


Continue reading

My New 'Botanica' Fine Fragrance Candle


Home fragrance is a passion of mine - something that enriches my life and makes it more beautiful. I love how it evokes memories and feelings, creates a welcoming atmosphere for our guests, and how such a small object can elevate our personal space in such an impactful way.

When I first decided I would like to start my own brand just over a year ago, I told my business partner, Vanessa, that it had always been a dream of mine to have my own scented candle. In sync in so many ways, it was an ambition of hers also.
 
For me, the most wonderful things in life are those which are all around us in nature. My happiest times have been spent enjoying the pleasures of a beautiful garden, surrounded by lovely things with no monetary value - the scent of a flower as it is carried through a breeze, the sound of buzzing bees as they go about their business, or the comforting warmth of the sun in the springtime after a long winter. I wanted to capture all of these memories in my first fragrance - this was the genesis of Botanica. 


Deciding on which fragrance notes we wanted to use in our candle was the first step in a long process. Vanessa and I both agreed that the scent of Rose should define the candle, a flower that is so evocative of an English Garden. We also knew that we didn’t want the candle to smell too sweet and that it should have earthy undertones, like you would experience in a vegetable garden, perhaps.

With this as our guiding principle, we contacted a Cotswold-based perfumer to create the fragrance for us. We gave a detailed brief of not only fragrance notes, but also how we wanted to make people feel when they lit the candle. Our fragrance expert achieved what we had been hoping for in the first sample - Botanica was born.


The next step was to design the actual vessel, and the packaging for the candle. I thought about all of the elements that made me think of an English Garden and then looked through photos that I’d taken in gardens that I’d visited over the years. 

I have always admired Botanical Art, and knew that I wanted the packaging for the candle to emulate the style of botanical art that I’ve had in my homes throughout my adult life. I contacted an artist that I’d discovered through Instagram, Israel de Alcantara, to ask if he would be able to create a series of illustrations based on the photos I’d taken in gardens over the years.


We worked together closely, painstakingly going over every detail to make sure that the vision for the packaging could be realised. We are all delighted with how it turned out, and I think it perfectly captures the beauty and pleasures of a garden. 

Here at Nicolas Fairford we have spent a lot of time focusing on every aspect of Botanica in the hope that all those who purchase it will enjoy not only the scent, but the entire experience.


I personally have centred my life and career around sharing beauty - this is my next offering which I hope you will love!

Nicolas x


Continue reading

Christmas Afternoon Tea Recipes

All of the recipes as featured in my latest YouTube Episode


Chocolate & Orange Cake

Ingredients:

140ml / 2/3 cups sunflower oil

2 eggs

200ml / 3/4 cups whole milk

325g / 1 1/4 cups caster sugar

85g / 1 cup cocoa powder

200g / 1 1/4 cups plain flour

3 1/2 teaspoon baking powder

Zest from 2 oranges

Fresh juice from 2 oranges


For the Ganache:

300 g (1 ¾ cups) dark chocolate

325 ml (1 ⅓ cups) heavy cream

1 tablespoon butter

1 tablespoon butter


Instructions

CHOCOLATE ORANGE CAKE

Preheat oven: 180°C / 160°C (fan) / Gas Mark 4 / 350°F

In a mixing bowl, beat the eggs, oil, sugar and milk together until fully combined.

In a separate bowl, sieve in the cocoa powder, flour and baking powder, then add in the orange zest and whisk them together.

Gradually pour the wet ingredients into the dry, stirring together as you pour until just combined. There may be a few small lumps left, but that’s ok.

In a microwave safe bowl, heat the orange juice in the microwave for 30-60secs, then slowly add this into the cake batter, mixing as you pour until the liquid has only just combined.

Divide the mixture evenly between the two greased and lined cake pans and bake for 25-30mins until risen, springy to the touch and a skewer comes out clean. 

Allow the cakes to cool in the tins for 10mins before moving to a wire rack to cool further.

CHOCOLATE ORANGE GANACHE:

Whilst the cakes cool, start making the ganache. In a heatproof bowl, heat the cream over a double boiler or in the microwave (30 secs at a time) until almost boiling.

Pour your hot cream over the chocolate and butter, letting this sit for 5mins before adding your orange zest and stirring until smooth.

Let your ganache set for 30-45mins at room temperature, until it reaches a spreadable consistency more solid than liquid.

Recipe courtesy of sweetmouthjoy.com


Christmas Scones

INGREDIENTS:

350g/ 1¾ cups + 2 tbsp Self-Raising Flour

95g/ 3tbsp butter

1tsp Baking Powder

3tbsp Caster Sugar

1/4 tsp Salt

150ml/ half a cup Egg Nog (or your milk of choice)

Icing sugar for dusting (optional)

Instructions:

Preheat the oven to 180ºc

Combine flour, baking powder, salt, sugar and butter into a large bowl

With your finger tips, knead everything together until you have fine breadcrumbs. It is very important to work lightly if you want to achieve a good texture. Running you hands under cold water before you do this step will keep your hands cool and help with this too.

Stir in the egg nog or milk. Make sure you stir with a knife - again delicately - so you don’t overwork the mixture.

With your hands, knead everything together until you can form a ball of dough.
Dust your work surface with a little flour and roll out the dough with a rolling pin to about a 1 inch thickness.

Use a cookie cutter to cut the dough into small rounds. If you don’t have a cutter - simply use the rim of a glass.

Place the scones on a baking tray and brush a little milk on each one to glaze.
Bake in the oven for 12-14 minutes until golden brown.

Allow the scones to cool for 5 minutes and dust with a little icing sugar

Homemade Cranberry Sauce
Ingredients:

200g/ 1 cup sugar
240ml / 1 cup water
350g / 2 cups fresh cranberries
2 tsp orange zest

Salt for seasoning

Instructions:

Heat the sugar and water together in a pan until the sugar has dissolved.

Add the cranberries and simmer until they burst. Heat gently until thick.

Once thickened add the orange zest and season with salt.


Continue reading
  • Page 1 of 5